Hoffa's Fat Pad Impingement
Knee pain is complex and there are different types of knee pain. One common knee condition affecting the front of the knee is Hoffa’s fat pad syndrome, often seen among the sporting or even the general population. It can affect one’s hobbies like running, cycling, hitting the gym, or even daily activities like going up and down the stairs. In this blog, we will be discussing Hoffa’s fat pad syndrome, which is often misdiagnosed as runner’s knee or jumper’s knee, two conditions that are more commonly known.
Anatomy of the Fat Pad
So, what is the fat pad, and where is it? The knee fat pad, just as its name suggests, is a cluster of fatty tissue located around the knee. There are several fat pads at the front of the knee, and the one we are referring to is located just below the kneecap. You can feel it on your knee; find your knee cap and slide your finger below it. The soft part that you can move is the Hoffa’s pad.

Anatomically, it’s sandwiched between the thigh bone (femur), shin bone (tibia), and the knee cap (patella), right within the knee joint. It is also found to be attached to the knee cap and the meniscuses. The fatty tissue that makes up the fat pad is dynamic; it alters position, pressure, and volume throughout knee flexion. Its main job is to act as a cushion between the knee cap tendon and the shin bone, as well as provide stability to the knee cap during knee movement.
The fat pad is very pain-sensitive. It is rich with nerve endings that can send pain signals to the brain—especially when impingement syndrome occurs. This explains why people with knee fat pad impingement often report sharp pain at the front of the knee, sometimes with swelling or tenderness below the kneecap.

What is the Hoffa’s fat pad syndrome then?
Hoffa’s fat pad syndrome, also known as Infrapatellar fat pad syndrome, is an acute or chronic inflammation of the Hoffa’s pad. It’s a common knee condition that often goes undiagnosed, especially in active individuals. Usually, there are two types of mechanisms of injury that cause inflammation in the fat pad. The first is direct trauma—for example, a fall on the knee or straightening the knee at high speed. The second, more commonly seen, is caused by repeated knee flexion movements, leading to Hoffa’s pad impingement syndrome, where the fat pad gets pinched under the kneecap against the thigh and shin bones.
Both mechanisms result in inflammation, which leads to swelling and increased compression of the fat pad. With this swelling, the pad can get caught even more easily. The inflammation also affects how the kneecap moves, disrupting normal tracking and forcing the knee to adopt abnormal movement patterns that may lead to further damage.
There is also a non-mechanical cause of fat pad issues, which is metabolic. It’s often associated with obesity and/or osteoarthritis (OA) of the knee joint. These conditions can inflame the fatty tissue in the area without any direct injury or trauma.
Alright, then. How do I know if my knee pain is Hoffa’s fat pad syndrome?
It is always being overlooked or misdiagnosed clinically, as its symptoms and presentations can be similar to some of the other front knee pains. However, there are a few symptoms that can help distinguish Hoffa’s fat pad syndrome from others.
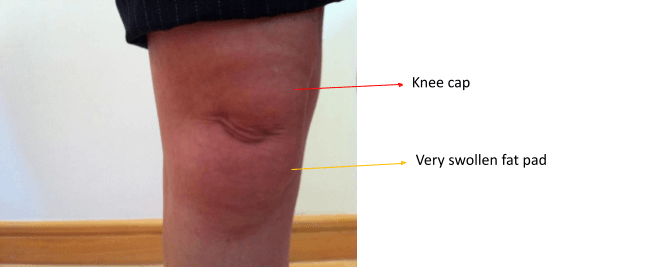
Tender or pain locally in the knee fat pad, at the front of the knee, under or at the sides of the knee cap tendon (refer to the yellow territory in the first figure)
Standing / walking are usually painful, especially when the knee is straightened
Worse with knee straightened, better if the knee flexion is maintained slightly
Worse with flat shoes or barefoot, better with heels
The fatty tissue in the pad is usually swollen if it’s under inflammation
With that being said, Hoffa’s fat pad syndrome is usually not a primary disorder, but more often a secondary one. This means the Hoffa’s fat pad is rarely injured in isolation; it’s more often caused by a previous or co-existing problem, for example meniscus injuries, ACL tear, or post-knee joint surgery.
Although the exact association of the fat pad and knee biomechanics is still being investigated, clinically, altered knee mechanics due to weak hip muscles and poor hip control are often seen in the Hoffa’s syndrome population. Dynamic knocked knees and tight knee extensors (the quads) can result in impingement syndrome of the fat pad and lead to Hoffa’s syndrome. In some cases, poor foot control that causes the arch to collapse inward (like flat feet) can also result in a knock-knee position, which again may cause fat pad impingement. Therefore, a very thorough assessment is needed to find out the root cause of the Hoffa’s fat pad syndrome.

Hmm alright, how do you treat a Hoffa’s fat pad syndrome?
Treatment will depend on how your Hoffa’s fat pad syndrome presents to us. If there is inflammation, we will definitely want to reduce the inflammation first before anything else. Dry needling, applying ice, or taking nonsteroidal anti-inflammatory drugs (NSAIDs, for example ibuprofen) are effective ways to reduce the inflammation. With the cooling off of the inflammation, pain will be hugely reduced and your knee will start to feel a lot better.
Aside from addressing inflammation, treating the tightness and tone around the knee, hip, or even ankle is also important in reducing the pressure of the knee cap against the fatty tissue of the pad. We sometimes use taping techniques to alleviate pressure off the knee fat pad, especially when there's ongoing impingement syndrome.
Once the inflammation of the Hoffa’s pad has gone down, we start investigating the root cause of the knee fat pad impingement. Whether the source is up from the hip, down from the ankle, or localised in the knee joint itself, there’s always something we can do to solve the culprit behind the issue. Manual therapy, dry needling, stretching, stabilisation, and physical therapy exercises are our main conservative treatment options, and they have proven to be very effective in getting you back to doing what you love.
Sounds good! But, is there anything I can do at home to reduce the pain from this fat pad syndrome?
Ice! Applying ice is always the first and crucial step to reduce the inflammation caused by Hoffa’s fat pad syndrome. You can use a cold pack, frozen peas, ice cubes, or anything you can find in your freezer. Just make sure you wrap a towel or cloth around your choice of ice to prevent ice burn to the fatty tissue.
NSAIDs can help reduce inflammation, but we always advise checking with your physician before taking one.
You should allow a few days to a week’s time for the inflammation to calm down. If yours is more of a chronic case, meaning you’ve had Hoffa’s syndrome for more than three months, you may need more than a week for the inflammation to resolve.
So, how do you know if the inflammation in the knee fat pad has reduced? Try touching the area. If it’s less painful or sensitive, that means inflammation has gone down. You can also look for signs like reduced swelling, redness, or warmth in the Hoffa’s pad.
Yesss my inflammation is a lot better now. What are the things I can do at home so that the fat pad doesn’t get impinged and inflamed again?
There are a couple of exercises that can be easily done at home to address the common factors that cause fat pad impingement. These home strategies play a crucial role in preventing referred pain, inflammation, and further irritation of the Hoffa’s fat pad. We will split them into stretching exercises and stability exercises as part of your ongoing conservative treatment plan.
Stretching Exercises
These stretches are mainly for structures and muscles that can increase the load and pressure on the kneecap, which leads to impingement of the fat pad. The commonly involved areas include the quadriceps, hip flexors, glutes, and iliotibial band (ITB).
Quadriceps
There are different ways to stretch the quadriceps, but this one is doable by most people.
Stand on one leg, and stretch the other.
Place the non-standing knee on something (like a couch, chair, or bench) for balance.
Use your hand to pull the foot toward your glutes, and feel the stretch at the front of the thigh.
Move the knee backward on the resting object to increase the stretch.
Hip flexors (Psoas major & minor, iliacus)
Get into a one-sided kneeling position.
Use a mat or pillow to protect the knee.
Move the front foot forward so the front knee is bent more than 90 degrees.
Keep your pelvis and body facing forward.
Shift your weight forward until you feel the stretch in the front of the hip on the kneeling side.
Rectus femoris (hip flexor & also part of the quadriceps)
This muscle contributes to both hip flexion and knee extension, making it important in managing Hoffa’s fat pad syndrome.
Kneel with a cushion under your knee.
Rest the back foot on a bench or wall (tip: set up your foot before your knee).
The front leg should be stable with the foot on the ground.
Keep the torso upright to feel the stretch in the back leg.
Lean back slightly to deepen the stretch.
Iliotibial band (and muscles on the side of the hip)
Use a stack of pillows or gym plates.
Rest the outside of your stretching-side foot on the stack.
Turn your upper body to face the stretching side.
Support yourself on your elbow or hand.
Cross the other leg in front and keep its foot grounded.
Roll your pelvis slightly more in the same direction to feel the stretch along the side of the hip.
Glutes
Lie flat on your back.
Bend one knee and move it across the body toward the opposite shoulder.
Hug the knee to enhance the stretch.
Feel the stretch around your glutes (and sometimes your hamstrings).
Avoid excessive rotation of the body to keep the stretch isolated.
If you feel a jammy or pinching sensation at the front of the hip during this stretch, it might be due to tight hip flexors. In that case, repeat the hip flexor stretch first before attempting the glute stretch.
Stability exercises
If you tend to stretch a lot and flexibility isn’t the issue, then stability and strengthening work are where your focus should be. The exercises below mainly target the gluteus medius, a key muscle located on the side of your hip. Its job is to keep your knee aligned with your hip and ankle during movements like running, squats, and lunges.
When the gluteus medius is weak or not properly controlled, the knee can cave in during movement. This inward collapse places excessive strain on the knee joint, increasing the load on the kneecap and causing fat pad impingement.

Clams (banded or not banded)
Lie on your side with both knees bent at 90 degrees.
Roll your pelvis slightly forward so your trunk faces directly ahead. (A common mistake is letting the pelvis fall backward, which reduces glute med activation.)
Keep your feet together and lift your top knee away from the bottom.
You should feel the side of your top hip working.
To make this more challenging, add a resistance band just above your knees.
Monster walk
Wrap a resistance band just above your knees.
Hinge at the hips and bend slightly forward from your trunk.
Make sure your knees and toes stay pointing outward throughout the movement.
Step diagonally forward and out to the side—think “monster steps.”
Focus on driving the movement from your knees, keeping outward pressure against the band. This is where the glute med does its job.
Single leg balancing
This is a control exercise; it teaches you how to activate key muscles and maintain proper alignment: hip, knee, and ankle in a straight line.
Muscles involved: glutes, quads, foot stabilisers, and core.
Do this barefoot if possible; shoes with cushioning can dull foot feedback.
Stand in front of a mirror for visual feedback.
Stand on one leg (the side you want to strengthen).
Hinge at the hip, pushing your glutes back and slightly leaning your trunk forward.
Slightly bend the knee, just a touch.
Watch out for the knee caving inward. If it starts to collapse, stop and focus on pushing it outward to maintain alignment.
Also, to keep your pelvis and torso square to the front, no twisting or rotating.
Once balanced, return upright by driving the hips forward, not just lifting the torso. This ensures the glutes are doing the work, not your lower back.
To calm down inflammation, expect around 1–2 weeks for pain to settle. From there, start introducing stretching and progress to stability and strengthening. The whole recovery journey typically takes at least 8 weeks of consistent, focused work.
Your timeline will depend on your goals and the severity of your fat pad syndrome.
At Elite Health and Performance, our therapists see this injury all the time and are skilled at identifying the root cause. Book online or give us a call, we’ll help you fix your knee, stop the pain, and get you back to doing what you love.